

Backup VMware Virtual Machines with Azure Backup Server
Microsoft Azure Backup Server a.m.a. MABS is a cloud-kickoff backup solution of Azure Fill-in designed to offer data protection across wide-ranging and diverse Information technology environments of enterprises to help maximize their backup efficiency. However, the principles used in a traditional environment to dorsum up a virtual environs is quite different to the one employed in Azure Backup Server. As such, information technology is necessary to get firsthand information regarding the creation of backup for VMware Virtual Machines with Azure Fill-in Server. The post guides you through this process.
Configure Azure Fill-in Server for VMware server workloads
Azure Backup Server tin protect and is sufficiently capable of backing up VMware vCenter Server versions.
The first footstep in the procedure is to establish a secure connection to the vCenter Server. For this, it is essential to have VMware Certificate Say-so (CA) certificate installed on Azure Backup Server. Then, you can use a browser on the Azure Fill-in Server car to connect to the vCenter Server via the vSphere Web Client.
But this connectedness will not be secure. To modify this scenario, do the following,
In the browser on Azure Backup Server, enter the URL to the vSphere Web Client. Instantly, the vSphere Web Customer login page should appear earlier you. At the bottom of the description provided on the right-hand side, you lot can find the link to download trusted root CA certificates.
Hit the link to forcefulness vCenter Server to downloads a file to your local computer. For user'south convenience, the file is named every bit 'Download'.

After that, depending on the kind of browser you are running, yous will receive a message prompting you to either open or save the file. It is advisable to save the file to a location on Azure Fill-in Server and when you do then, brand sure to add together the .zip file proper noun extension. With the .zilch extension, information technology becomes easier to excerpt all the tools.
When done, correct-click download.naught, and select 'Extract All' selection to excerpt the contents. Once the action is complete, all the contents will exist added to a folder named certs. Ii types of files will be visible under the certs folder. (Note: The root certificate file has an extension that begins with a numbered sequence like .0 and .i. The CRL file has an extension that begins with a sequence like .r0 or .r1. The CRL file is associated with a certificate.)
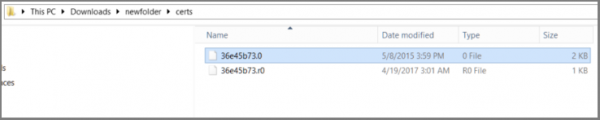
In the certs folder, right-click the root document file, and so click Rename. Change the root document's extension to .crt. When you lot practise so, the icon for the file volition alter to an icon that represents a root certificate.
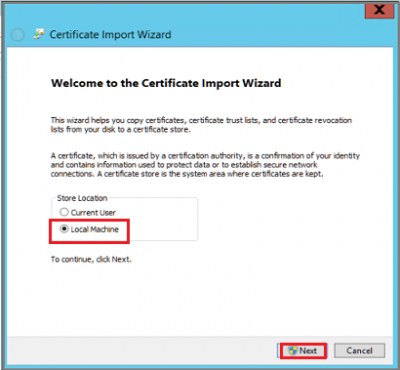
Right-click the root certificate and from the pop-up carte, select Install Certificate. The Certificate Import Wizard dialog box will exist displayed. When information technology is seen, select Local Automobile as the destination for the certificate, and hit the Next button to continue.
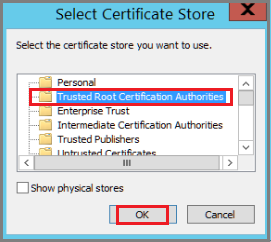
Next, on the Certificate Store page, select 'Place all certificates in the following shop' option, and then click Scan to cull the certificate store.
Choose 'Trusted Root Certification Authorities' as the destination folder for the certificates, and then click OK as seen in the pic below.
Before exiting the 'Completing the Document Import Wizard folio', make sure that the document is in the desired folder. When verified and all appears fine, click Stop.
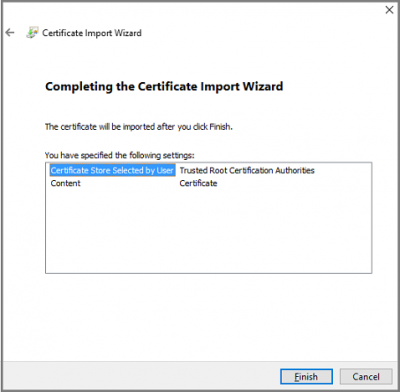
A dialog box should appear on your figurer screen confirming the successful completion of document import. Sign in to the vCenter Server to confirm that your connection is secure.
The 2d step in the process involves, create a part and user account on the vCenter Server. So, create a function with specific privileges, and associate the user account with the function, after that.
Azure Backup Server uses a username and password for all backup operations. For calculation a vCenter Server function and its privileges for a backup administrator, exercise the following,
Sign in to the vCenter Server, and nether the vCenter Server Navigator console navigates to Assistants choice and select information technology.
Under 'Assistants' heading, select Roles, and from its console choose the add role icon (the + symbol).
![]()
Upon confirming this, a 'Create Part' dialog box will pop up on your computer screen.
There, in the empty field provided against 'Role name' box, enter a text. Information technology should be specific to the purpose.
Next, select the privileges and check the icon side by side to the parent label to aggrandize the parent and view.
When done, click 'Ok'. The new part will go visible in the list on the Roles panel.
The above step marks the terminate of the second pace. The 3rd step is to create a vCenter Server user account and permissions. For this, access vCenter Server Navigator panel and detect 'Users and Groups' section under information technology. Select information technology, to display 'vCenter Users and Groups' panel.
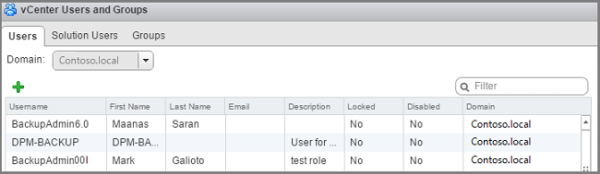
From it, cull the first tab 'Users', and so click the add together users icon (the + symbol).
The action when confirmed will brandish 'New User' dialog box. Under information technology, add together the user'southward information and so click OK. The new user business relationship will announced in the list.
Next, associate the user account with the role and go along to consummate the last step of the procedure which includes calculation the vCenter Server to Azure Backup Server. To complete this, apply Product Server Addition Wizard. Information technology helps in adding the vCenter Server to Azure Backup Server.
Utilize the Azure Backup Server panel to admission Production Server Addition Wizard.
Under it, select the 'Production server type' every bit shown in the epitome and choose the 'Add together' tab to add the VMware server to the list of Added VMware Servers.
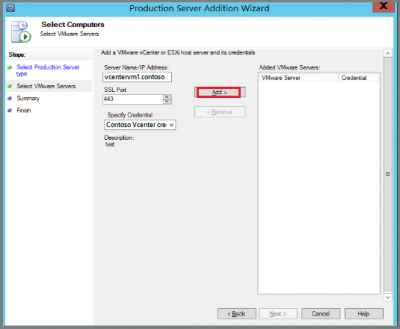
Finally, move to the 'Summary folio' and add a specified VMware server to Azure Backup Server. The new server gets added immediately. Click Next to motion to the adjacent page in the wizard. This marks the terminate step of the process with the End page showing you lot the results.
This was just the gist of the procedure. To read the complete pace-by-pace setup, yous can refer to this Microsoft document.

Source: https://www.thewindowsclub.com/backup-vmware-virtual-machines-with-azure-backup-server
Posted by: cummingshapten1947.blogspot.com
0 Response to "Backup VMware Virtual Machines with Azure Backup Server"
Post a Comment